The goal of this blog post is to give you the “beginner” guide to how to work with Google Tag Manager server-side tagging.
What is Server-Side Tagging?
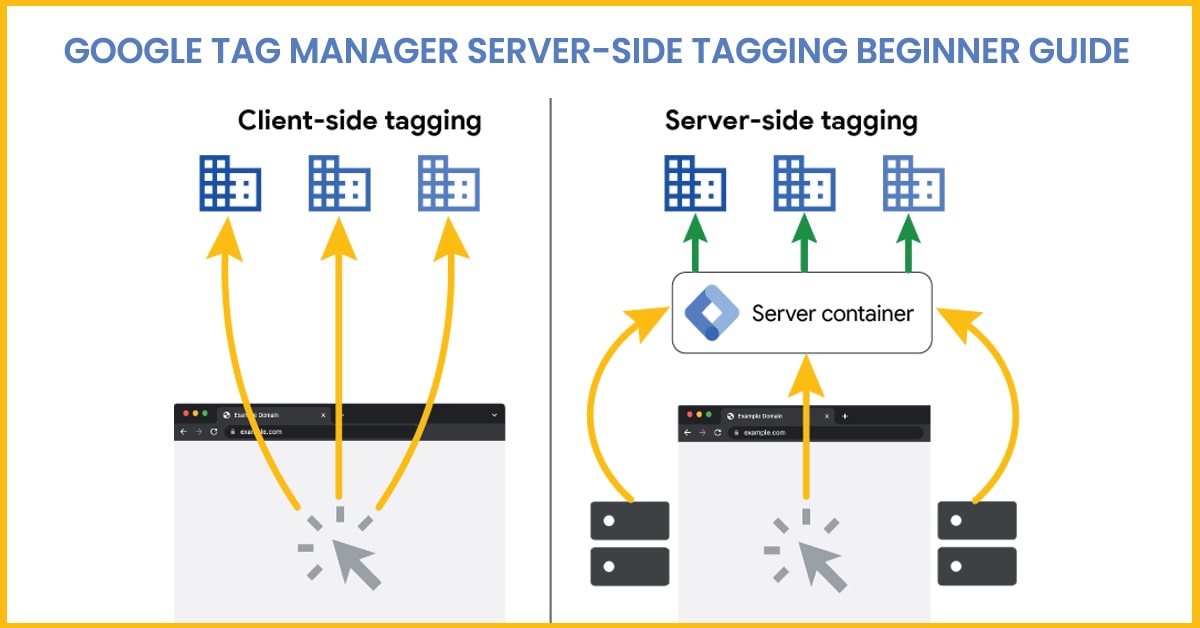
Server-Side Tagging (GTM SST) is a new way to use Google Tag Manager that allows you to move some or all of your website tracking and analytics tags from the traditional client-side approach to a server-side approach. It means that tags are loaded and executed on a server rather than in the user’s browser. This can provide faster page load times, more accurate tracking data, and better compatibility with privacy regulations. Client-side tagging may be describes as the tags on your website or app are executed on the user’s device. Therefore, Server-side tagging handles the tags on your website or app are executed on a server. The below table shows the differences between a server container and a web container;
| Server containers | Web containers |
|---|---|
| Server containers run in the server | Web containers run in the browser |
| Server containers digest HTTP requests | Web containers use the dataLayer |
| Server containers only use sandboxed JavaScript | Web containers can deploy HTML tags and run custom JavaScript code at runtime |
| Server containers can incur costs from maintaining the server environment | Web containers are cost-free |
With GTM SST, you can configure your tags to be loaded and executed on a server-side platform, instead of on the user’s browser. This allows you to take advantage of server-side data processing capabilities, such as client IP address or HTTP headers, and overcome ad-blocking or cookie-blocking issues. GTM SST also provides more granular control over the data that is collected and sent to third-party tools like Facebook Ads, Google Analytics or Google Ads, It can also reduce the risk of data breaches and improve website performance.

Pros Cons of Server-Side Tagging
(+) Improving website performance & speed with reducing page load
(+) Better security due to privacy concerns with controlling the owned data
(+) Closing the gap of tracking discrepancies with reducing the impact of ad blockers and extending the cookie expiration
(-) Server maintenance is not FREE
(-) Not for everyone as it requires technical knowledge
How much does Server-Side Tracking cost?
As mentioned above, server-side tracking option is not free. Even the Tag Manager account and the whole process is costless, it’s required to use servers to process the data (events, traffic etc.) And that cost might increase based on the event requests and the number of visitors on your website.
- You can proceed it through Google’s Cloud Platform, if you would like to know the costs you can also visit Google Cloud Pricing Calculator
- Or use other solutions like Stape.io which starts from $20 per month but also has a free option with limitations like for 1 Cloud Server and up to 10K requests
- Or just handle it with manual setup using other cloud platforms.
GTM Server Side Tagging Installation Step by step Tutorial
Bear in mind if you decide to use Google Cloud Platform, you need to create a billing profile with adding your payment information to that platform and you will be charged monthly based on the data usage. But if you’ll create a new profile you may have receive a free credit to be used for a limited time period, so any cost will be deducted from that credit.
I suggest you to use same email address that have admin access to all Google’s services and platforms as it’ll be just simple to proceed on sharıng account and properties between Google Tag Manager, Google Search Console and Cloud Platform.
Let’s dive in to learn how to set up server-side tracking for Google Analytics via GTM:
- Open your Google Tag Manager account and navigate to Admin section
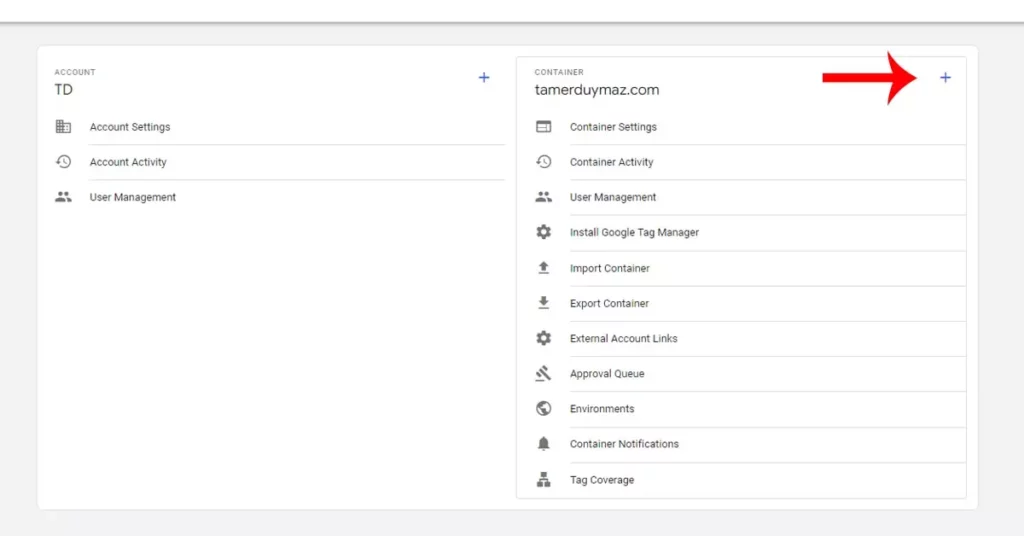
- Click to plus (+) icon to create a new container (server) and name it however suits you best

- There are 2 options here; automatic provisioning setup and Scripted / Manual deployment.
- Automatic (Google App Engine) option is the easiest way as a Google Cloud Platform project is automatically created for your environment, I’ll use that option at this article.
- Click on Automatically provision tagging server option for Google Cloud Platform.
- And choose or create a billing account (here is the payment process steps in)
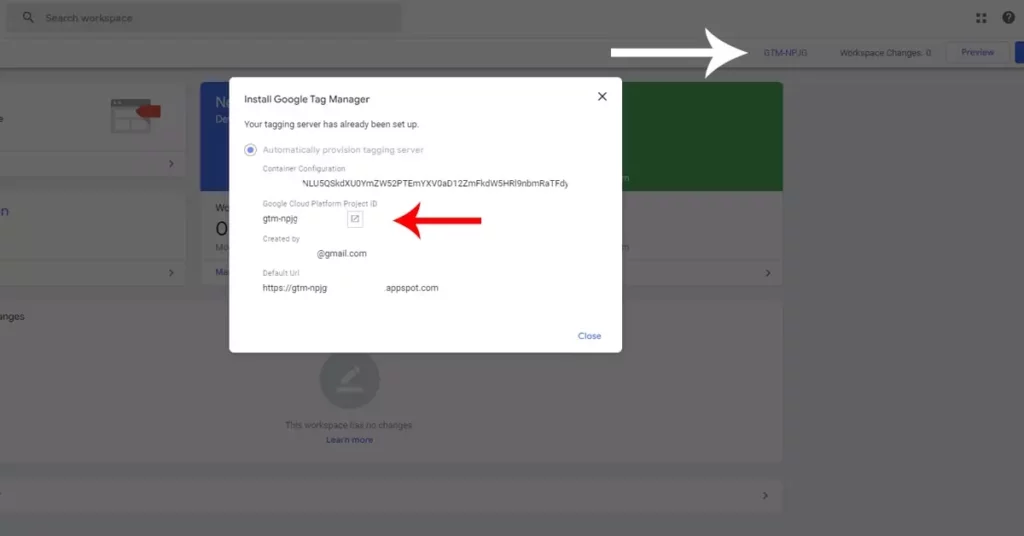
- After waiting for a while on GTM screen the new server container will be created.

- The default URL is the address assigned for this project and you can use it as server container URL to send data from GTM.
- At this step, you should test that URL bu copy it add /healthy path to the and and paste to a browser. If you see the text “OK” that means all is good to go!
However, it’s recommended to use a subdomain of your website instead of that default URL, so let’s dive into these steps. Also red more on setup a custom domain
- Open your Google Cloud account to create a subdomain (not to use default url) you can simply open it from your GTM account

- Navigate to Appengine > Settings > Custom Domains and click to “add a custom domain” = https://console.cloud.google.com/appengine/settings
- You should select a domain (just select from the list if you are using same email of Search Console) and/or verify it.
- And choose a name for the subdomain that you’ll use for this project. You can name it however you wish; i.e. serverside.tamerduymaz.com
- At last step you’ll be asked to update DNS records for that subdomain. That may vary based on your service (hosting/domain) provider.
- Let me show is with GoDaddy example:
- Open your Godaddy account and navigate to My Products and Domains, click on your domain and open DNS section to Add New DNS Records.
- You simply need to use the subdomain to “Name” field add “A” type and “AAAA” type records using the values from Cloud Platform.
- It may be needed to add CNAME or just a TEXT to submit the subdomain as a new record. It may take few minutes or up to 24 hours for these changes to take effect.

Upgrade Google Cloud Server
When you completed all the previous steps, you are ready to use server container connected to your Google Cloud account. However, it’s only “testing” environment which has limitation to process the data and connections. If you even have small-mid size website, the actual capacity won’t be enough to handle all your traffic. In order to avoid the issues, you need to upgrade your account and reconfigure the tagging server for a production environment using Google Cloud Platform (GCP) App Engine, you can details here: Set up server-side tagging with App Engine That means you will have extra costs for servers (minimum 2) and cost for processed data on the cloud account.
Configure GTM Server Container
After all these steps, we need to turn back to Tag Manager account to finalize the setup and make tests.
Make sure to open Admin Container settings and then Update Tagging server URL with that new subdomain.
You can set up many other third-party apps such as Facebook Conversion API, via their own platform or select a custom tag in the Community Template Gallery
- Clients: This section is the main difference from the web containers. Clients are responsible for getting and processing/adapting the data received by the GTM server-side container.
- You can create a “Google Tag Manager: Web Container” in order to process the data in your server and that might help you to bypass adblockers and gather more user data.
- Tags: This is pretty self-explanatory, there are few native tags which you can directly use in server-side container or just direct the existing ones from web container.
- Triggers: It has the same functions but lack of available options compared to web containers.
- Variables: It differentiate with “Built-In Variables” which are used to parse information about the incoming request.
Let’s configure server-side GTM account
- At first, get familiar with “Clients” It’s recommended to create a new client for different purposes and services. GA4 client will be created automatically and no changes needed.
- And then, send data from the web container (unless other options used) as explained at the next section below.
- After that, you need to create “Tags” and before proceeding forward just navigate to Variables section to enable all Built-In Variables including Client Name utility.
- It’s enough to have one GA4 tag. There are not many native tags yet, but you can explore Community Template Gallery for other options.
- If you are running Googge Ads, you must also add “Conversion Linker” tag.
- In case you may have multiple clients in use, it’s better not to trigger the tag for all events, but specify with Client Name Rule, as shown below just add a rule to limit it;

Send GA4 data to server-side Tag Manager
There are a few option to send data to that created server-side container, the easiest way using Tag Manager, so I’ll follow that option here.
- Send data from a website to your server-side container via GTM or Google Tag
- Use a Google Analytics 4 tag to send data to a server container (optional)
- Send data from sources other than websites via mobile or server-to-server apps
If you already have GTM web container, you should simply change that destination URL and forward all requests to your fresh new server-side container.
Open the “Google Analytics: GA4 Configuration” tag and select “Send to server container” with adding the Container URL.

All the tags/events’ data that use that GA4 Config, will be sent automatically to server-side. However, if you use other configuration tag it’s needed to follow same steps for those as well
Final Step: Testing
I suggest to start to test after couple hours or even next day to make sure that the subdomain will be activated with DNS record updates.
In order to send hits with a browser, you need to enable the Preview mode both on Server Container and Web Container. Visit your website that opened by web preview mode and navigate the pages to complete the events. After that, visit Server Container preview page to check whether the GA4 tag and other events are fired without any issues.
That’s all for the initial setup of GTM Server Side Tagging 🙂 If you’ll have any questions or require a service do not hesitate to comment and/or reach me out.
